
Methods for Cold Stratifying Native Plant Seeds
On November 1st the Edmonton Horticultural Society and Touch Grass Club gathered in William Hawrelack Park to collect, process, and grow native seeds. This may seem like an odd time of year to be concerned about seeds, but this is the perfect time to plant native seeds in order to have them growing in the next season.
Native plants of North America have evolved to adapt to the extreme conditions like the frigid cold and clay heavy soils. Not all native plants require freezing conditions to grow, but the vast majority of them do – from Goldenrods to Yarrow. Learn more about the science of dormancy here!
We will discuss a few methods of cold stratifying native seeds of Alberta. Linked here is a native plant ID guide so you can begin identifying native plants that you could collect seeds from. Firstly we would like to note that when potting mix is mentioned, we are referring to HP Promix potting mix. This is a soilless mix that is weed and disease free, which makes germination easier. It is available at any reputable nursery and some big box stores.
Cold Stratification
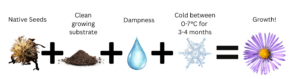
The term “cold stratification” describes a process where seeds must be exposed to cold in order to germinate and grow. Seeds that require this stratification are seeds that remain dormant until they are soaked and go through a cold period. For the sake of simplicity, we will only review methods for “moist” stratification as this meets the germination requirements for the majority of herbaceous plants from our climate.
Steps to break dormancy:
Germination Methods
Ziplock Bag in Fridge
Pros: Very easy and high germination rate
Cons: Fragile root system can be damaged when seperating/transplanting, some sensitive plants or those with taproots may struggle with this method.
Instructions:
- In November, gather potting mix – a sharpie, ziplock bag, and native seeds (species found here)
- Label the date and species you are stratifying on the bag
- Dappen the potting mix – ensure no water drips when you squeeze the dampened mix in your hand
- Place seeds in mix within the ziplock bag
- Place sealed bag in the fridge until the warm weather returns in May
- In May, prepare plant pots with drainage placing them in potting trays, and fill the pots with potting mix
- Remove seeds and mix from the bag and place them in the prepared pots
- Place the pots and potting trays outside in a place with partial shade (~4 hours of sunlight)
- In June, move the pots with their potting trays into full sunlight (6+ hours of sunlight)
- When watering the pots, ensure the mix stays moist but not sopping wet, water the pots “from the bottom” by watering the potting trays and not the soil from above. Watering from the bottom of the pot provides benefits like:
- Prevents seeds from being disturbed or washed away
- Encouraging more root growth downwards
Outdoors in Pots
Pros: Everything is well labelled and seeds cannot be blown away
Cons: You have to pay a lot of attention to how much water is accumulating in the potting trays
- Prepare pots with drainage filled with potting mix, placed in potting trays
- Place 3-5 seeds per pot
Label the pots and seeds- Place the pots with potting trays outdoors in a sheltered area near your home
- Forget about it until May
- Come May, place the pots with potting trays into a yardspace with 6+ hours of sun
- Water the pots by placing water into the potting tray
- Transplant plants into your garden once there is 4-5 leaves
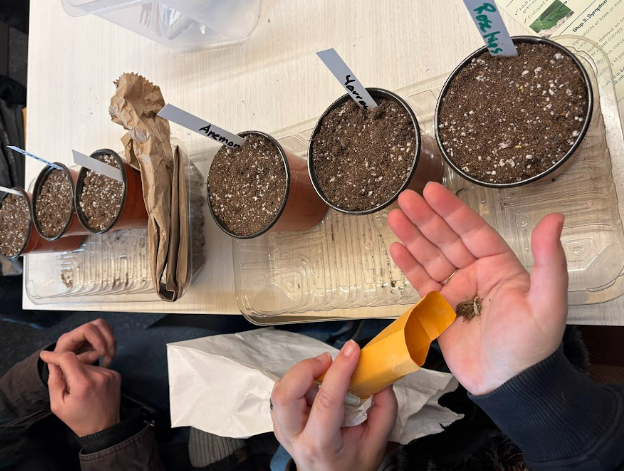
This is an example of setting pots outside with seeds to cold stratify.
Direct Sowing in Garden
Pros: Easiest to start from bare ground
Cons: Seeds can get blown by wind or eaten by animals, weed seedlings can be hard to identify and outcompete the native seedlings you are growing
- Right before the ground completely freezes solid and after a few frosts in late October or early November, look for an area in your garden where the soil is in 6+ hours of sunlight in the summer, and is able to hold moisture well. Ideally this is an area you will be able to water often in the spring.
- Place the seeds in the area you want to grow the plants in
- Place some leaf mulch (not too much) to stop the seeds from being blown away in wind
- Forget about the area until spring
- In spring when the ground thaws, begin watering the area so it remains moist regularly
First Year of Growth
In the first year of life for a native plant establishing itself from seed, it devotes a large majority of its energy to root growth and development.
This means that you will need to be patient when waiting for the plant to produce flowers. Depending on how much sunlight these plants receive, it can take 2-3 years before flowers show up. If the plant is lacking flowers after 3 years, the plant may not be receiving enough sunlight and may need to be moved in the following spring. It is best to move native plants during the late spring and early summer when you are expecting rain.
Native biennials will only flower once before they reach the end of their life. Their first year they are very plain, usually just a stalk with leaves. Their second year they will begin to flower, then vanish after flowering. You’ll want to collect seeds on these species during the year they are blooming!
Growing Considerations of Native Seeds
- Many native seeds have evolved to germinate from where they fall or where they were carried by the wind. The seeds can become suffocated easily so it is recommended that they are planted in well drained soils and no deeper than half an inch. Some may need light to germinate and should not be covered. Feel free to review the planting guide for goldenrods, and continue to refer to your local native plant societies and councils for updated growing guidelines.
- Native seeds evolved to make use of moisture from snow melt and rains in late May and Early June. The changing climate is causing disruptions in these cycles with dryer and cooler spring temperatures. You may need to water the area sooner than you are expecting some years to ensure the right conditions for germination.
- When transplanting the seedlings you have grown, wait until 4 leaves have developed from the seed before placing it into the ground. You must weed the area regularly.
- Even though you may place the seeds in the freezer, time for the seed spent below 0 degrees does not necessarily mean that seed has reached
If you have any other questions on how to succeed with native plants please feel free to reach out to info@edmontonhort.com or reach out to other organizations like the Edmonton Native Plant Society and Alberta Native Plant Council.