Lights, Trays, Action! Indoor Garden Setup
by Brett Kerley
A grow station is a great way to garden year-round and extend the season by getting a jumpstart on your outdoor year. While indoors, your growing “season” is less affected by the winter cold outside, you still benefit from considering Alberta’s conditions.
- Choose a space in your home that remains reasonably warm (ideally above ~18–20 °C), stable, and with access to power and ventilation.
- Because outdoor daylight is limited in winter, having good artificial lighting is key.
- Indoor air in Edmonton tends to be dry in winter due to heating — this can affect seedlings/humidity. Ensuring airflow and possibly humidity-control will help.
You can use your indoor station both for starting seedlings for your outdoor garden and/or for growing herbs, micro-greens or small veggies through the winter.
Equipment Checklist
Here’s what you’ll need, with notes specific to your environment and savings tips:
Grow lights
Use full-spectrum LED lights (or good quality “shop lights”) rather than relying on a sunny window alone. In Edmonton’s shorter daylight months, this becomes even more important.
Tip: Use LED “shop lights” rather than expensive horticultural-specific lights — you’ll save money while getting sufficient light intensity.
Light timer
Set your lights to simulate a natural day length (for seedlings maybe ~14-16 h), which helps indoors where natural daylight is inconsistent.
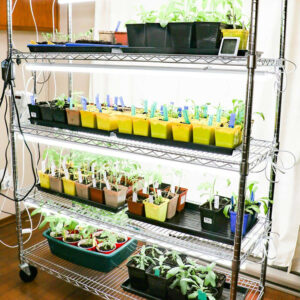 Shelving / rack / plant stand
A stable metal shelf unit allows layering: trays of seedlings beneath lights, space for germination covers, and later growth stage. Using vertical space is particularly helpful indoors when floor area is limited.
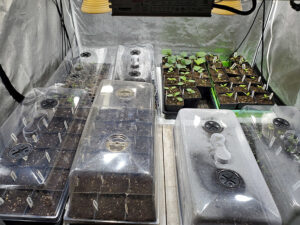 Germination cover / mini-greenhouse
An enclosed environment (clear dome or plastic cover) helps with humidity and consistent warm conditions for seeds. Once seedlings emerge, open it up to improve airflow. Stagnant air encourages mould and fungus.
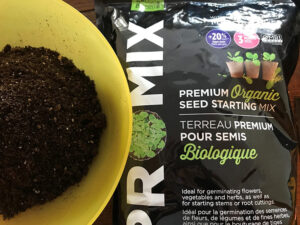 Trays, seedling containers, potting medium
Use trays or small cells filled with lightweight seed-starting mix. The trays catch water underneath to protect floors. Given winter indoor conditions, ensure good drainage and avoid waterlogging. I only use Pro-Mix for my seedlings as that is what I used when I was working as a perennial manager in a greenhouse. It worked well for me, but if you have your favourite starting soil that works, send me a note so I can try it out.
Ventilation / airflow
Because indoor spaces in Edmonton may have dry, heated air, a small fan or keeping a window cracked for ventilation helps strengthen seedlings and prevent fungal issues. I purchased a couple of computer fans locally, I think they were $15-$20 and the plug into a USB port. Very simple and it works for me.
Optional: Heat mat or bottom heat
If your indoor space is cooler (e.g., basement or unheated room), a heat mat can help. But if the space stays ~20 °C or higher, you can skip this to save cost.
Step-By-Step Setup
- Select your location (warm, stable, with power).
- Install shelving or rack.
- Mount or hang grow lights above the shelf (ensure good coverage). 6-12 inches above the plants is a good height.
- Plant your seeds and put the cells, peat pots, or pots in a tray with water.
- Place seed trays under the lights; if using a germination cover, set that over trays for initial days.
- Plug lights into the timer, then programme it. 14 to 16 hours of lights is recommended.
- Ensure ambient temperature is adequate; if not, consider warming the area or using a heat mat.
- Open the cover once seedlings emerge for airflow. A small fan can also help produce strong, healthy seedlings.
- Monitor growth: raise lights or lower shelf as plants grow to maintain proper light distance.
- Transition: if you’re starting seedlings for outdoors, begin hardening off when conditions allow; or keep plants indoors (herbs/greens) for winter produce.
Cost-Saving Tips
- Use LED “shop lights” rather than expensive grow-brand lights.
- Reuse existing shelving and trays, especially if it’s your first year.
- Skip the heat mat if your space is warm enough.
- Use a timer to ensure lights aren’t running unnecessarily.
- Use reflective surfaces (white walls, foil, reflective board) to maximise light use and reduce the number of fixtures needed.
- Start small, scale up once you understand your space and plants.
I purchased my shelving from Home Depot, my heat mats from Home Hardware, and seeding supplies from various garden centres. I try to shop at the local greenhouses and garden centres that give me my EHS membership discounts. The costs can add up and you can really save quite a few $$$ with that membership.
Specialty Suppliers in Edmonton
You can get most of what you need at local greenhouses and hardware stores, but there are some specialty shops around Edmonton where you can purchase the equipment. Visiting local stores can help you see the gear in-person and get advice.
Hydro‑Lite Hydroponics & Garden Supplies
- Located in Edmonton (two locations). (Hydro-Lite Hydroponics)
- They specialise in grow lights, hydroponic equipment and indoor-growing supplies.
- Good for selecting LED lights, trays, shelving, timers.
- Tip: Ask staff about energy-efficient LED shop lights and how to adapt them for vegetable seedlings rather than ornamental plants.
T&T Hydroponic Garden Supply
- Address: 14925 112 Ave NW, Edmonton. (Hydrotek Hydroponics)
- Offers a broad catalogue including lighting, grow tents, containers—some of which may be over-spec’d for basic seed starts but could be useful if you expand.
- Tip: Compare their higher-end gear with more modest sets (LED shop lights + standard shelf) for cost-effectiveness.
Adapting to Edmonton’s Conditions
- Because Edmonton winters are long, you can use the indoor seed set-up to begin seeds earlier than they can be planted outdoors, giving your outdoor garden a head start. This is especially good for long-season crops like tomatoes, peppers, and alliums. You can extend the crop by planting lettuce and other leaf crops indoors to transplant into the garden for an early harvest and then direct seeding the next crop.
- For true winter indoor growing (herbs, salad greens), maintain lighting ~12-14 hours, keep plants away from cold drafts from windows/doors, and monitor humidity (heated homes are dry).
- Use lower-wattage LEDs and smaller trays if you’re only growing herbs or microgreens to reduce operating cost.
- The indoor station can bridge your love of nature and outdoor gardening by keeping you engaged in green growth year-round, rather than just outdoor in the warmer months.
Final Thoughts: Green in All Seasons
 An indoor grow station is more than just a collection of lights and shelves—it’s a way to keep gardening woven into everyday life, even when Edmonton’s winter has settled in for the long haul. By creating a simple, efficient setup indoors, you can nurture plants, starting seeds, and enjoying fresh greens while the outdoor garden rests under snow.
Whether your goal is to get a head start on spring vegetables, keep herbs thriving on the kitchen counter, or simply stay connected to growing things through the darker months, an indoor grow station offers flexibility and year-round satisfaction. With energy-efficient lighting, a modest investment in equipment, and a bit of planning, it’s entirely possible to grow successfully indoors without breaking the budget.
For Edmonton gardeners, this approach extends the gardening season, builds confidence with seed starting, and helps ensure stronger, healthier plants once it’s time to transition outdoors. Most importantly, it keeps the joy of gardening alive—proof that even when winter feels endless, there’s always room for something green to grow.
Until spring returns, happy growing indoors—and may your seedlings be sturdy, your lights bright, and your gardening spirit well-lit all year long.