Compost: Black Gold For Your Garden
Written by Jennifer Walsh
What is Composting?
Composting is a natural process that breaks down dead plant and animal matter, returning important nutrients and chemicals back to the soil. Many gardeners have taken the hint from nature, and compost their organic waste from their kitchens and yards. With time and patience, these lucky folks are left with a rich, earthy material that’s great for their plants, lawns and gardens.
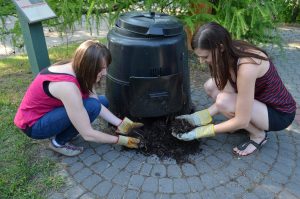
Photo credit: City of Edmonton
Why Compost At Home?
Today, many communities make compost from their residents’ food and yard waste. Edmonton is no exception – the City has been composting residents’ organic waste since the year 2000. While it’s great that these organics aren’t being wasted in a landfill, many people still choose to compost their own organics at home. And who can blame them? There are some many benefits to home composting. Consider the following:
- Plants love home compost. It’s chock full of important nutrients and chemicals. Your plants need these nutrients and chemicals to grow well, so whenever you add compost to your garden soil or rake it into your lawn, you’re giving your plants a nutrient boost.
- Compost is great at holding moisture. Your soil stays damp for longer after you water, thanks to compost. This is good for your plants, especially during dry spells. It also helps prevent erosion, so if it’s really rainy, your soil is less likely to wash away.
- You save money. You can enrich your soil without buying compost from the store. And because compost is nutrient-rich, you’ll use less man-made fertilizers too.
- You’ll reduce your waste footprint. Trying to be waste wise? Then home composting is the way to go! Consider this: on average, half of the stuff you throw out is compostable. That’s a lot of good organic material being wasted in a landfill!
- You’ll help save energy. It takes energy to get all that waste from your home to the landfill, too. And even if your community composts for you, consider that many large scale composting operations also use a lot of energy and resources, both in transporting those organic wastes and in producing the compost.
- You’ll be the envy of the neighbourhood. Think about how good your garden and lawn will look when you use your homemade compost. Your neighbours will want to know your secret. Don’t be shy – convert them to your composting ways!
Best of all, composting is easy. That being said, you can’t just pile your organics in a corner of your yard and wait for a miracle to happen. Home composting will take some work and careful thought on your part, but in the end you’ll be pleasantly surprised by how little effort it takes for such a great payoff.
Getting Started: Choosing a Composter
Getting Started – Choosing a Bin
Talk to fellow gardeners who home compost, and you’ll no doubt get an earful on the best type of bin or pile to have. After all, there are many different ways to compost, and many different bin options. How you corral your organics is ultimately up to you, but if you’re just getting started, a commercially-made bin is usually a good way to go.
There are plenty of good commercially-made bins on the market. If this is the route you choose to take, look for these features in your prospective bin:
- Does the bin allow for airflow? Look for vents on the side of the bin. Fresh air is needed in the composting process. Air also helps keep odours at bay.
- Can you easily access the compost? You’ll want to turn your compost, and at some point, remove it from the bin when the compost is done. Look for a bin that provides easy access for turning and removal.
- How big is the bin? For most beginners, your bin doesn’t need to be bigger than one cubic metre (think dishwasher size). You can always add more bins as your compost productivity increases.
If you’re handy, you can also build your own compost bin. Again, you’ll want to consider airflow, ease of access, and size when designing your bin. But you’ll also want to think about your materials – and here’s where you can get creative. Old wood pallets, stakes and chicken wire, used tires, industrial wooden spools – the choices are endless. There are plenty of design ideas available on the internet or at your local library. We also have article on Compost Bin Construction.
The City of Edmonton has lots of information on bins you can build. Check out Do it Yourself Composting Bins for some great ideas and plans.
Using a bin for home composting does have its advantages. As pretty as a big ol’ heap of decomposing organics can be, some folks don’t want to see this out their picture window. If this is you, then a bin can help contain your organics while helping to maintain the aesthetic pleasantries of your yard. Bins also help increase the heat in your pile, which can speed up the composting process, and can protect your valuable organics from the weather. Depending upon the design, a bin can also help keep critters out of your compost.

This composter has good ventilation and easy access for both adding materials and retrieving the finished compost. The black colour will also help transfer heat to the pile, speeding up the composting process
Photo credit: City of Edmonton
")
Multiple bins make it possible to manage compost that is at different stages
Photo credit: City of Edmonton
Choosing A Spot For Your Bin
You need to consider the best spot to put your bin. Here are some tips for choosing the optimal place for your bin:
- Look for a sunny location. Heat from the sun will help speed up the composting process.
- Look for a location that’s sheltered from the wind. Less wind also means less materials blowing around your yard. Strong or steady winds can also cool down or dry out the heap.
- Make sure the ground is level, well-drained, and easy to access. Placing the bin close to your back door means shorter trips with your kitchen organics – and you’ll appreciate its closeness when winter hits.
- Leave some space around the bin. This will allow for airflow, but will also provide space to store extra compostable materials, like grass clippings or fall leaves.
HELPFUL HINT: Got a few spots that might fit the bill? If your bin is portable, try placing it in a different location over the seasons, and see how it impacts your compost production. This way, you can find the spot that works best for you.
Feeding Your Bin
All in all, the compost bin is not a fickle container – it’ll take a variety of kitchen and yard wastes with nary a complaint. But to produce quality compost, you’ll need to watch what you feed it, and how you feed it.
What organics can go in the composter?
There are two types of organic material you should put in your composter: green material (these are nitrogen-rich wastes) and brown material (these wastes are carbon-rich). You need both to have a successful compost heap.
Good greens:
- Vegetable and/or fruit peels and scraps
- Leafy greens
- Coffee grounds
- Tea leaves
- Weeds (make sure they haven’t gone to seed)
- Green grass clippings
- General garden waste
Good browns:
- Dried leaves
- Straw
- Woody branches
- Peat moss
- Shredded paper
- Sawdust (from clean wood only – no treated or painted wood)
- Wood chips
HELPFUL HINT: If you want your composter to work faster, try chopping your organics into small pieces before you place them in the bin. Small pieces decompose faster than large pieces. But be careful: if all the pieces are very small, they may settle and compact together, taking away valuable air spaces. You’ll want to turn your compost more often if the pieces going in are small.
Certain organics can cause problems in the composter. Don’t compost these organics:
- Meat and bones
- Any fats, oils, or grease, or foods covered in these fats
- Dairy products (cheese, yogurt, etc.)
- Diseased plants
- Pet waste
How should organics be added to the composter?
You will want to add your organics to the bin in layers.
- First, add some tree branches or other pruning material into the bottom of the bin. This will create some air space in the bin.
- Next, layer in some brown material, then some green material.
- Finally, add some garden soil on top the green material. Make sure all the greens are covered.
- Keeping making layers of browns, greens, and soil.
Every time you add fresh material to the bin, mix it in with the top layer. Not only will this add air to the compost, it will also help introduce some of the good microbes and bacteria to the new material.
HELPFUL HINT: In general, you want to add equal amounts of browns and greens to your composter. But if you’re just starting out, try adding a bit more brown material than green material. Too many greens can cause problems in your composter. A lot of browns in the bin might slow down the composting process, but it will cause fewer problems.
Want to learn more about carbon/nitrogen ratios in compost? Check out what Professor Rot has to say on the matter: http://www.homecompostingmadeeasy.com/carbonnitrogenratio.html
What else should be added to the composter?
There are two other ingredients your bin needs in order to make good compost. These are water and air. Both are needed in order to break down the organic material.
How can you tell if your compost needs water or air? Look for these signs:
- Does the inside of your bin look dry and dusty? If so, you may need to add water to your compost. Add just enough water so that the material feels like a wrung-out sponge. You can also try adding a few more greens to your bin.
- Does the inside of your bin look wet and swampy? When you open the lid, are you hit by a wave of stink? If so, you’ll need to add some air. Mix in some browns, like dry leaves or peat moss, and stir up the compost to get more air flowing around the material.
Maintaining Your Compost
Once you’ve got your compost bin started, it only requires a little bit of maintenance from you. Here’s what you can do to keep your compost bin happy:
- Turn or fluff your compost once a week. Not only will this introduce air into the heap to help break down the organics, but it will also help to combat odours.
- Watch the moisture level. Remember, the material should be about as dry as a wrung-out sponge. Add water and greens to dry compost, and browns and air to wet compost.
- Add more material over time. The organics will settle as they break down, leaving you room to add more good organic waste. Remember to mix in new material to the top layer each time you add new stuff.
That’s it! Keep up these simple steps, and within four to six months, you will have beautiful compost for your garden.
Composting In Winter
Composting in the Winter
Just because it’s cold and snowy doesn’t mean you have to stop composting. Here are some tips to help you compost throughout the winter:
- Save some fall leaves. These are good browns to add to the bin as you add green kitchen scraps. Bag up the leaves in the fall, and leave them by your composter.
- Make sure your bin is a sunny spot. Even on cold days, a little sun can make just enough heat to get microbes composting.
- Shelter the bin from winter winds. This will prevent the heap from drying out.
- Add some moisture. A little melting snow dumped on the pile can enough moisture to kick-start the composting process. Or, add a little warm kitchen water, such as lukewarm tea or cooled cooking water.
Want to learn more about composting in the winter? Check out the City of Edmonton’s advice here: https://www.edmonton.ca/residential_neighbourhoods/gardens_lawns_trees/compost-in-winter.aspx

Here's Jack on the heap, waiting for spring
Photo credit: Henry Owen
Harvesting And Using Your Compost
How you remove the compost from your bin will depend on the type of bin that you have. Here are some general steps you can take to harvest your compost:
- Remove any un-composted material from the top of the bin. Set aside.
- Remove the compost from the bottom of the bin. Finished compost looks like dark, crumbly soil, and smells wonderfully earthy.
- Put the un-composted material back in the bin.
You may notice small bits of woody material in your harvested compost that have not finished breaking down. That’s okay. When added to your garden, these woody materials will add bulk to your soil, and will continue to break down as new decomposers get at them. This will leave small spaces in the soil, which will allow air move in and around the roots of your plants.
If you plan to use your compost as top dressing for your lawn or in a potting mix, you may wish to remove these unfinished bits. Simply screen it using a half-inch metal screen, and put any unfinished materials back in your composter.
Once you’re happy with your compost, you can use it anywhere in your yard! Top-dress your lawn, mix it into your vegetable or flower gardens, or mix it in with potting soil. Then sit back, and enjoy the fruits of your labour in your beautiful garden!
Troubleshooting
Even the most experienced composter can be surprised by the inner workings of their bin. So if things aren’t working out right for you and your composter, there’s plenty of help out there.
First, see if any of these common problems apply to your heap:
- Compost is stinky, and looks very wet. Your heap has too much moisture. Add some browns, and give it a good stir to introduce more air.
- Compost smells like ammonia. You may have too many greens in your bin. This is a common problem when a lot of grass clippings are plopped in the bin and allowed to settle into a big mat. Give your compost a good stir to allow air in.
- Things are composting verrrry slowwwwly. The materials going in may be too big, or may be too dry. Try cutting the materials into smaller pieces, and add some moisture or topsoil to the compost.
- My bin is full of flies! Flies can move in if fruit and vegetable waste isn’t covered up. When you add this material, make sure to cover it with topsoil, or bury it into the existing material.
- Mice have moved in! Mice, wasps, and ants may move into a heap that’s too dry. Add some moisture – no one likes to live a wet house.
If you’re still having troubles, don’t give up! There’s help in the community! Here are some great people who can help:
- Call the Compost Doctor! The City of Edmonton has staff and volunteers who are available to help diagnose your composting woes. Call 780-496-5526, or email compost@edmonton.ca. They can even arrange to send a Compost Doctor to do a home visit!
- Take a course. The City of Edmonton offers composting workshops at the John Janzen Nature Backyard Compost Education Centre. Visit edmonton.ca/compost for more details.
- There are several trained Master Composter Recyclers who are also Edmonton Horticultural Society members.
Sources
https://www.edmonton.ca/residential_neighbourhoods/PDF/City_Edmonton_Composting_Booklet.pdf
https://www.gardeningknowhow.com/composting/basics/managing-compost-odors.htm
https://www.gardeningknowhow.com/composting/basics/garden-compost-benefits.htm
http://www.compost-info-guide.com/compost_bins.htm
http://www.compost-info-guide.com/browns.htm
About the author: Jennifer Walsh is a writer, educator, and a graduate of the 2017 Master Composter Recycler volunteer program.