Step Five (Fill Mold, Part One)
[/fusion_text][/fusion_builder_column]Scoop approximately half of the concrete mix into the plastic-lined mold with your trowel and spread (wearing rubber gloves) as evenly as you can to all parts of the mold.
Press your pre-cut wire mesh into the concrete. This will give the bowl strength.

Leaf Bowl Project

Filling the Mold
Step Six (Fill Mold, Part Two)
Slowly add the rest of the concrete on top of the mesh and spread firmly into the mold, shaping and smoothing as you go. Don’t rush. You should have lots of time before the concrete sets. Be sure to smooth the edges and press the center of the mold firmly while drawing the concrete up the sides of the mold so that you achieve a shallow bowl shape. (* See Step Eight for more on shaping). The concrete should be about two inches thick but I did not worry about thickness specifically.

Filling the Mold
Once you have finished with your trowel, drop it in a pail of water for easier cleanup later. Add some water to the empty tub or wheel barrow for easier cleanup later.
Step Seven (Make Leaf Impression)
Now, it is time to make the leaf impression. Gently position your leaf or leaves face up on the mold as you wish them to appear in the finished product. With gloved hands, gently but firmly press and smooth the leaf/leaves well into the mold, paying special attention to the veins to be sure they are well pressed-down.
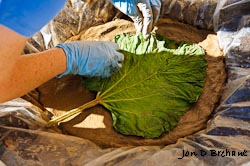
Imprinting the Leaf

Imprinting the Leaf